Joomla Form With File Upload Generate Pdf
Are yous fan of the Joomla! Custom Fields and you're missing a way to add together a File Upload Field? Would you similar to exist able to upload a PDF or a ZIP file directly in the article's editing folio and brandish the respective download link in the front-end? Or maybe give your users the power to upload a contour photo while registering for a new business relationship?
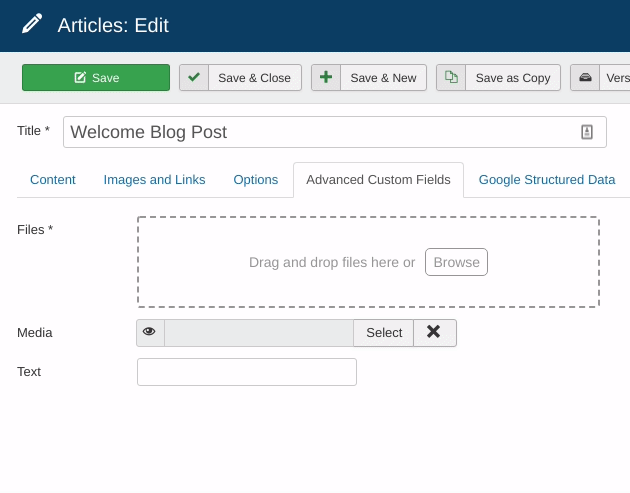
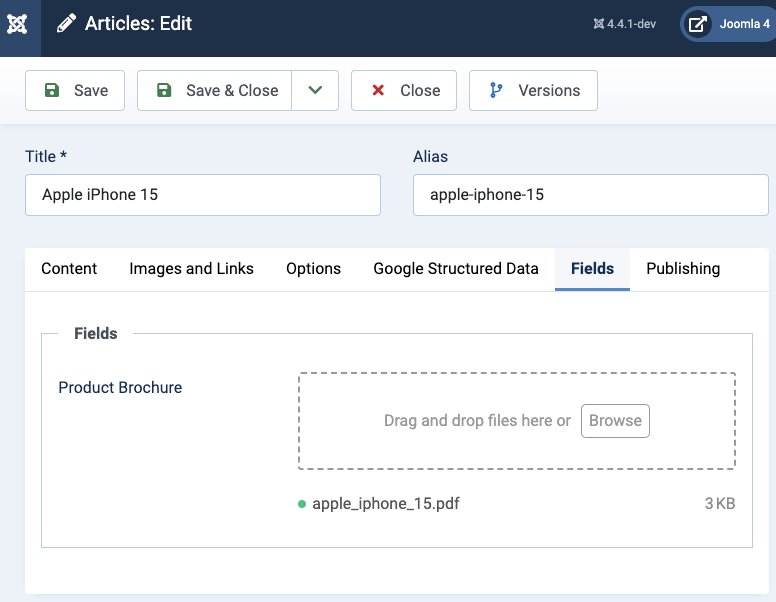
Advanced Custom Fields extension offers a elevate & drop multiple file upload field that tin can be used with any component that supports the Joomla! Fields. Beneath you tin see an case of a file upload field added in the article editing page.
- Add a File Upload Field to Joomla! Articles
- Add a File Upload Field to Joomla! Registration Form
- The File Upload Field Settings
- Translate the File Upload Field into your language
- Frequently Asked Questions
- Troubleshooting
- Create Avant-garde File Upload Forms in Joomla!
How to add a File Upload Field to Joomla! Manufactures
The File Upload Field tin be used with whatever component that supports the Joomla! Fields such as the Articles (com_content), User (com_user) and the Contact (com_contact) component. Let'due south see a existent-world example where content authors tin upload a PDF file in the article's editing folio in the backend and website visitors can see a download link in the forepart-terminate.
Step 1: Create a new File Upload Field
Go to Content -> Fields, click New to create a new field. From the Type dropdown, select the ACF - File Upload option.

Click to save the field in order to return back to the same folio where now, you tin can meet 2 new setting groups.
Footstep 2: Set the File Upload rules
In the 1st group called File Upload Settings, we can gear up rules and restrictions on the files that are allowed to exist uploaded by our field. In our example, we want limit the user to upload 1 PDF file upwardly to 2 MB.
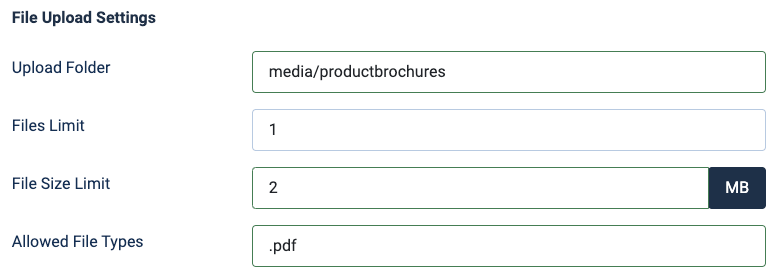
- Prepare an upload folder to the respective option.
- Set Files Limit to 1
- Set up File Size Limit to ii MB
- Set Immune Files Types to .pdf
Stride 3: Set up how the uploaded file volition be displayed in the front end-end
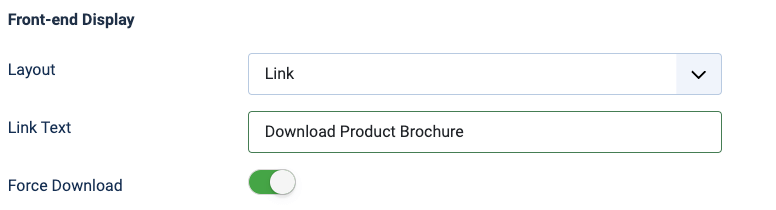
In the 2nd grouping chosen Forepart-end Brandish, we tin define how the uploaded files will be displayed in the front-end. In our case, we want to display a downloadable link to the uploaded PDF file. To do so, follow the steps beneath:

- Set Layout to Link
- Ready Link Text to Download Product Brochure or anything similar.
- Enable Strength Download. This pick forces the browser to download the file on the current window, instead of navigating to information technology on a new tab.
Save the field and proceed to the next step.
Step 4: Upload a PDF file in your Joomla! article
At present, that we have our file upload field properly configured, we should be able to meet it on the commodity'south editing folio in the back-terminate.
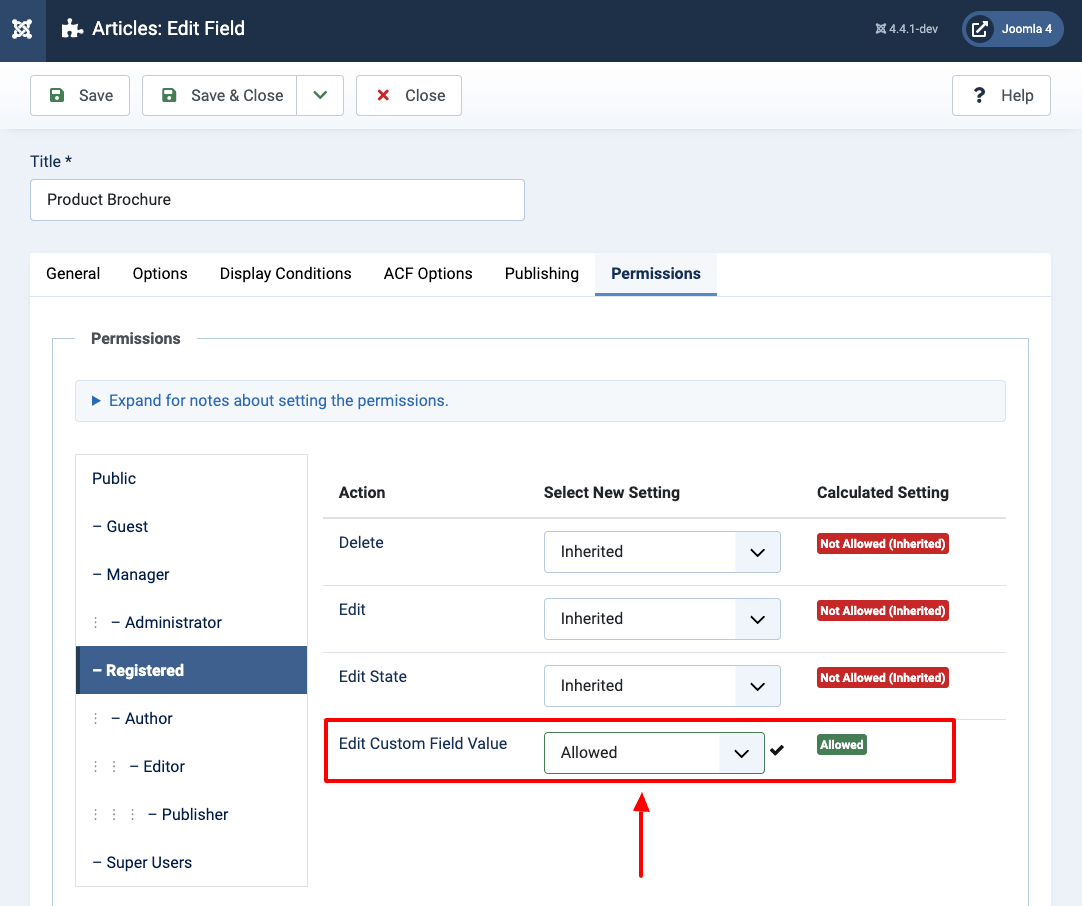
In case the field is displayed disabled in the form and you lot're non allowed to upload files, y'all're probably don't have the correct permissions to edit the content of the field. To set it, yous must fix the Edit Custom Field Value pick to Allowed in the Permissions tab in the Field settings likewise as in the Content component configuration page.
The terminal step is to upload a PDF file and save the article. Finally, depending on your Joomla! template, y'all should exist able to see a similar download link as shown in the picture below.
How to Add a File Upload Field to Joomla! Registration Form
At that place are cases where you lot'd like to enhance the Joomla! registration form with custom fields and specifically with a File Upload Field. A mutual case is where we want the user to upload a contour photo while they register for a new account on our site. That photo tin exist and so displayed and edited in the user'southward profile page.
Footstep i: Create a new Field Upload Field
Become to the Users -> Fields, click New to create a new field. From the Type dropdown, select ACF - File Upload.
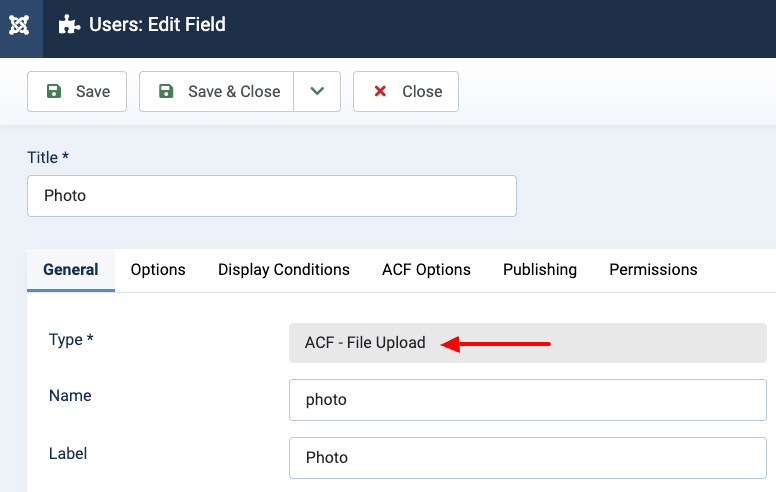
Click to salvage the field in order to return dorsum to the aforementioned page where at present, you tin can see 2 new setting groups.
Footstep ii: Set the File Upload Rules
In the 1st grouping called File Upload Settings, nosotros can set rules and restrictions on the files that are allowed to be uploaded by our field. In our case, we want limit the user to upload 1 image up to 3 MB.
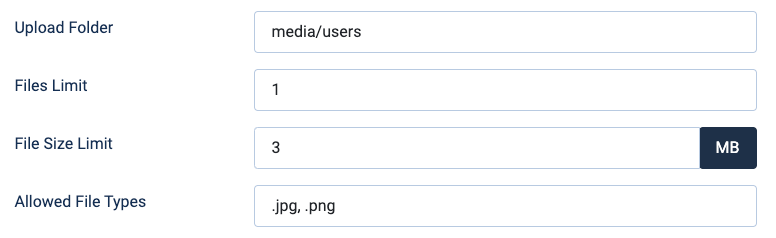
- Prepare an upload binder to the corresponding choice.
- Set up Files Limit to i.
- Prepare File Size Limit to 3 MB.
- Set Immune Files Types to .jpg, .png.
Footstep three: Set how the uploaded file volition exist displayed in the user contour folio
In the 2nd group called Front-end Brandish, we can define how the uploaded files will be displayed in the front-end. In our instance, nosotros desire to display the actual uploaded image when the user views their profile page. To do so, prepare Layout to Paradigm.

Save the field and proceed to the next steps.
Step iv: Test the Joomla! Registration Form
Go to the registration form in the front-end. There, yous should be able to meet the file upload field we created in the previous step.
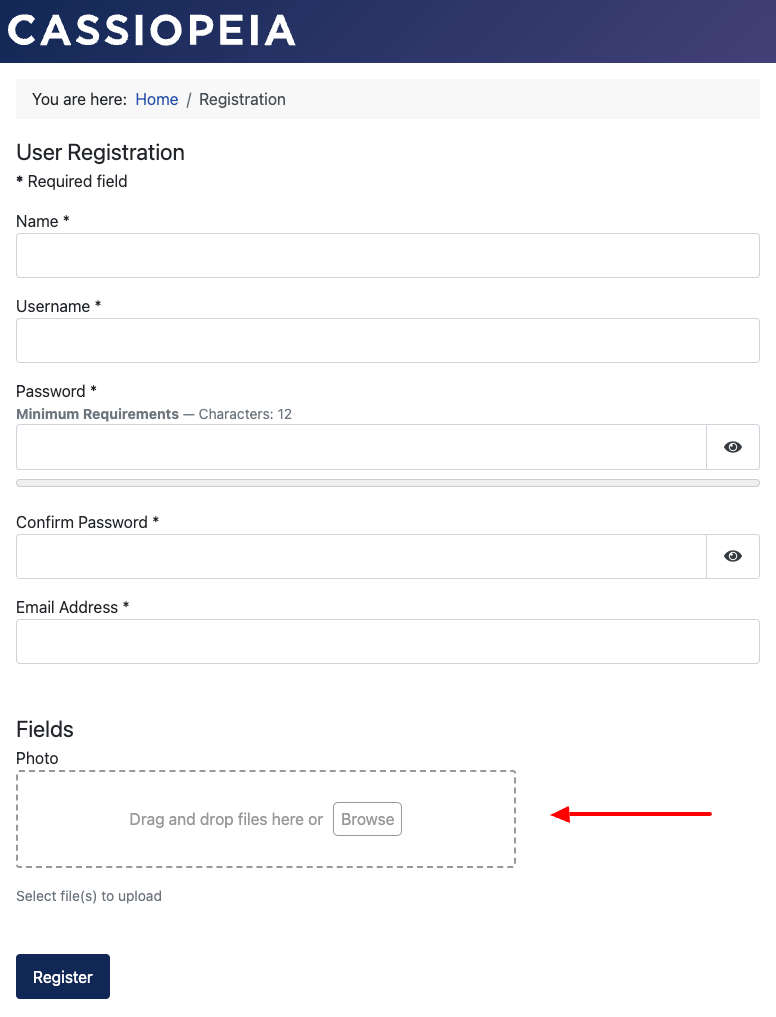
Note: Go along in listen that the styling of the course showing in the film above may vary depending on your site's template.
In case the field is displayed disabled in the form and you're non allowed to upload files, you're probably don't take the correct permissions to edit the content of the field. To fix it, you must set the Edit Custom Field Value option to Allowed in the Permissions tab in the Field settings equally well equally in the Users component configuration folio.
Pace v: View the Uploaded Photo in the User Profile Folio
After you lot've created a test account, go to the User Profile page, where you should exist able to see an overview of the business relationship including the uploaded photo.
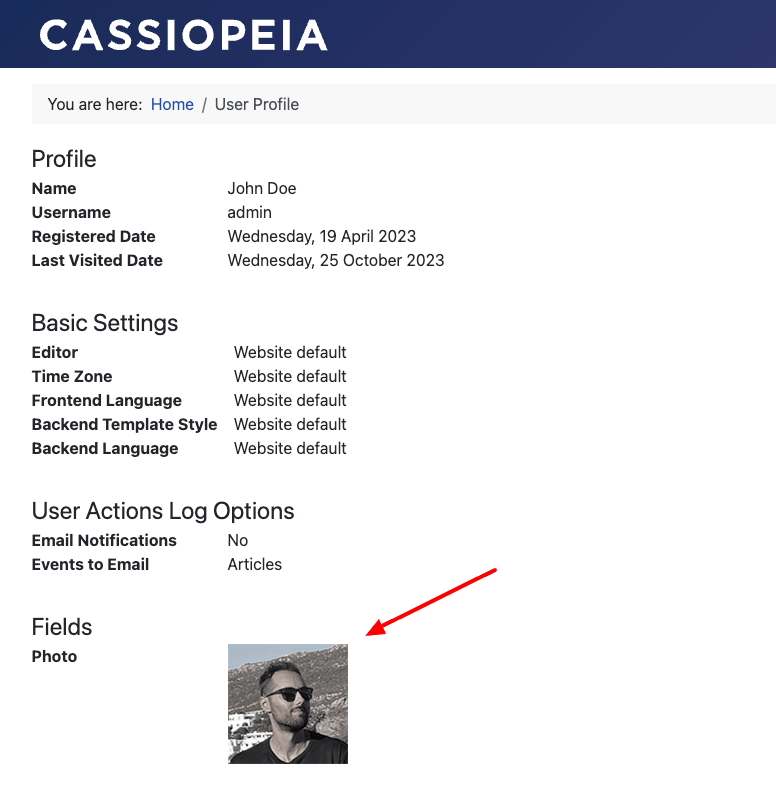
To remove the uploaded photo or upload a new one, go to the Edit Contour Page.
The File Upload Field Settings
Beneath, you tin observe a list of the available options of the File Upload Field.
| File Upload Settings | |
|---|---|
| Upload Folder | Enter the path relative to the root of your webspace where the uploaded files volition be stored. Make sure the path entered is writable, otherwise the file upload will fail. |
| Files Limit | Enter the full number of files the user is allowed to upload. Enter 0 for no limit. |
| File Size Limit | Configure the maximum allowable size for each uploaded file in megabytes. Enter 0 for no limit. |
| Allowed File Types | Comma separated listing of allowed file types. Case: .jpg, .gif, .png, .pdf. Continue in mind that this is not fool-proof and can be tricked. |
| Randomize File names | Enable to add a random prefix to the showtime of each uploaded file proper noun. This helps to ensure existing files with the aforementioned name never get replaced. |
| Allow Unsafe Files | Allow the upload of unsafe files. A file is considered unsafe when:
Proceed in mind that this option keeps you rubber from dangerous files included in a compressed file (zip, rar, tar e.t.c.) equally well. |
| Front end-terminate Display | |
| Layout | Define the layout that will be used to brandish each uploaded file in the front-finish. The available options are: Link, Prototype and Custom Layout where you can set your ain HTML layout. |
| Link Text | The text that will be used in the link. (Available in the Link layout). |
| Forcefulness Download | Select whether to download the file instead of navigating to the link. (Available in the Link layout). |
Frequently Asked Questions
How can I translate the field into my linguistic communication?
To translate the texts used past the File Upload Field into your language, y'all will demand to practice an override of the following language strings:
- ACF_UPLOAD_DRAG_AND_DROP_FILES="Drag and drop files hither or"
- ACF_UPLOAD_BROWSE="Browse"
To larn how to create a linguistic communication override in Joomla, visit: https://docs.joomla.org/J3.x:Language_Overrides_in_Joomla
How can I set up a different upload folder for each user?
If you rather each user have their own upload folder, you tin can use the {user.id} Smart Tag in the Upload Binder to pull the ID of the user'due south account, eg: /media/{user.id}. In this instance, users with id #456 and #678 will have their uploads stored to /media/456/ and /media/678/ respectively.
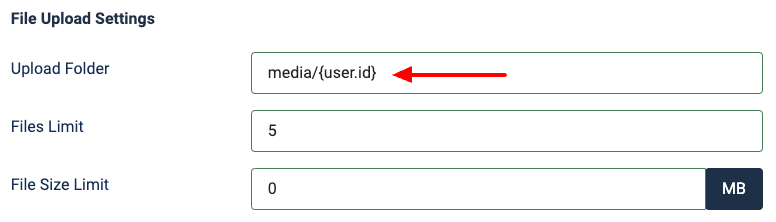
If the ID of the user is not that applied, you may use {user.username} Smart Tag to pull the login name of the user, eg: /users/uploads/{user.username}. In that case, users with username, john and maria will have their upload files stored to /users/uploads/john/ and /users/uploads/maria/ respectively.
Note that the User-based Smart Tags crave the user to be logged-in. Otherwise, the Smart Tag volition always return an empty value.
Troubleshooting
I become "Unsupported File" error when I effort to upload any file
First make certain the blazon of the file you're trying to upload is set in the Allowed File Types option in your file upload field settings. Next, verify the Fileinfo PHP extension is installed and enabled on your server. This is required to guess the mime type of the file.
Create Avant-garde File Upload Forms in Joomla!
In case the Joomla! Custom Fields don't fit your needs or you're looking for a way to create avant-garde file upload forms, try Catechumen Forms. A Joomla! Form Architect extension that integrates with the same Drag & Drop File Upload Field every bit Advanced Custom Fields does.
Source: https://www.tassos.gr/joomla-extensions/advanced-custom-fields/docs/how-to-add-a-file-upload-field-in-joomla-forms
0 Response to "Joomla Form With File Upload Generate Pdf"
Postar um comentário